Monday, May 05, 2008

The first pages are up


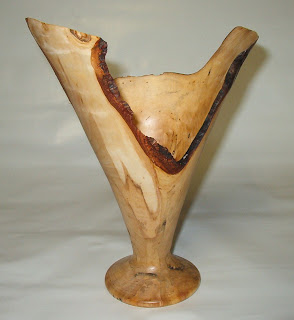
I have gotten the first pages up about this new spruce burl. I think this one will be a vase shape. The top will be a challenge because the opening is larger in principle than it is in practice. That is, the shape of the opening looks like it should give more room to get a tool inside than is really the case. This will make more sense as the piece progresses.

Friday, May 02, 2008

Next Burl

So here is a picture of the next spruce burl on the lathe. it was wrapped around a branch as you can see. One of the things I think is going on in the branch is tension that may lead to a split, but that should not matter in a decorative piece like this will be. There are a lot of worm holes in this one. I suspect the spruce bark beetle. It has decimated some of the stands around here although nothing like the pine bark beetle has done out west.

This one is a lot of fun. I will try to get a couple of pages up on the web site in a couple of days.

Thursday, May 01, 2008

Wood turning today

Things have been quiet in the shop. On the weekend we took a trip to Ontario to visit our son and daughter. It was a great time and I saw a lot of trees, but there was little time to turn any wood or to meet with fellow wood turners. Maybe next trip. When we got home I had a raspy throat which did not bode well, especially since I had a funeral to handle the next day. Sure enough it developed into a terrible head cold. I got through the funeral as if there was a choice, but no time in the shop. Today was the last day of a weeks vacation but it was all I could do to get out of my own way. Tomorrow I hope to get back to a piece that is on the lathe, another spruce burl hollow form. I will try to get some pictures up soon.

Monday, April 14, 2008

Remounting the Natural edged Bowl

I have managed to get a video up on YouTube regarding remounting the natural edged bowl, preparatory to finish turning. This one illustrates well the use of a hot glue block.


There have been some questions raised as to the use of hot glue with a glue block.


  • it is the same glue the crafters use. I have used heavy duty but find it no better.

  • make sure the gun is hot

  • the wood surfaces need to be reasonably flat or very slightly concave

  • the surfaces need to be dry


These are just the precautions you would use with any glue block. However, with hot glue there is no real need to clamp and you can turn right away.

Tuesday, April 08, 2008

Work in Progress : Done The Spruce Burl


Let the bells ring out and the banners fly or fry or whatever they want. I finally got the spruce burl finished and it looks good if I do say so myself. Any comments are appreciated here. I like to learn.

This was a lot of fun and I have another one on the go. Soon I will get some pictures and stuff up about it too.

These burls allow for a lot of reflection as they turn, both the light from them and the light that dawns as considerations are given to the next cut or sanding pass. The nice thing about spruce burls in our neighborhood is their commonality. Lots of them and most are just thrown away so they are fun to play with and if one blows apart, there is usually another to hand. come to think of it I have not ruined one in a long time. Maybe I am not pushing the envelope enough.

Monday, March 24, 2008

Work in Progress : hollow form bottom


I got the bottom sanded and done. One of the questions I get asked frequently is about doing bottoms, as in "how to?" It turns out (all puns intended) that one of the easiest ways to accomplish a good bottom is not to turn it but rather to sand it. The motion is to mount a sanding pad to a lathe, drill press or other motor and work the wood against the pad.

Start with a motion that begins in the middle and works its way to the edge. Concentrate on sanding almost to the edge. You will actually get right to the edge and the start in center will leave the bottom concave so it will sit right.

I use a wood burner to put my name, the type of wood and the year along the bottom. Indelible ink pens like an ultrafine Sharpie work well here also. The page is found at working the bottom

Thursday, March 20, 2008

work in progress: burl on the lathe - remove the block


I have put a couple more pages up on the web site dealing with turning the spruce burl. The piece has been flipped end for end and the glue block removed. This is one of the things that throws people at first but it is fairly simple. Just take your time.

It is easy to rush things this near the end. Unfortunately, that can make a catch happen and there is not a lot of wood left on the piece. One good catch and boom she goes. While there is a lot said about riding the bevel and making sure the edge is sharp and all that other true stuff, the big thing is to take your time. There is no need to rush.

Think about the cut.
Make the cut.
Look at the result.
Do it over.

Remember that the fun is in the doing and the result is just nice to see. Ok, a lot of the fun is in the result too, but take the time to enjoy the cuts. Chances are, none of us enjoy the catches.

Have a good Easter.

Darrell

Friday, March 14, 2008

work in progress: burl on the lathe - outside prep


I have managed to finish hollowing the vase or hollow form or whatever this burl is, and I have gotten the outside ready to finish. see it here
It introduces one of the questions that may hit several times as you turn a burl that allows a glimpse into the interior, "how much of the interior should be revealed and what do the edges of the opening look like?" A lot of the time the change from one thickness to another at the unsupported edge of the openings will allow a very thin membrane of wood to extend over the opening or negative space of the burl.

Those membranes can be left or removed. Each change alters the amount of light that enters the vessel along with varying shadows. The style of edge affects shadows and depth perceptions. How shall these things be done so as to leave the natural look of the burl but also expose its beauty to the viewer?

Hopefully I have begun to answer the questions.

Saturday, March 08, 2008

work in progress continues: hollowing


I have had a couple of hectic weeks of funerals at work, annual meetings, and computer problems. In fact I am writing this on my laptop because my desktop, and favoured computer, is in the shop.

I did get a bit if time in the shop and also some time to write up a couple more pages on the spruce burl. One of the things I noticed as I was hollowing the piece is the drilling of the center with a 1/4" gouge. This is something I learned from Maurice Gamblin who has been turning professionally for twenty years now. Still I do not see many others doing it. I have used drills for the purpose but the gouge is easily as fast and more versatile. In fact, many vessels can be hollowed using only the gouge.

Anyway, I hope you enjoy the pages

Wednesday, February 27, 2008

work in progress: burl on the lathe 2


The work on the burl continues after a day or so hiatus. I had a funeral and that takes precedence over everything, even turning. Nice fellow, but sixty years of heavy smoking catches up with you. Lung cancer. Take care of yourselves and use those dust masks when sanding.
Anyway I got the piece roughed and attached a faceplate and glueblock to be able to use all the burl. I have used epoxy which is likely overkill, but I like overkill especially when I take the chance of throwing something at my face. You can see the work as it continues if you would like to take a look.

Sunday, February 24, 2008

Spam warning

Hi
I just checked my blog here and found a comment by Tojagal. Clicking on it immediately led me to one of those obnoxious registry scanner programs designed to scare the crap out of anyone who does not know better. Total spam. The comment has been deleted. Do not click on comments by Tojagal. Spam, spam, spam. Now back to wood turning.

Friday, February 22, 2008

work in progress: burl on the lathe


I managed at last to get a chance to get a couple of pictures and thoughts up about the first spruce burl. It is about 10" x 10" but will likely produce an 8" hollow form given the vagaries of burls. So far I have been able to make some design decisions and find out some of the difficulties it will throw at me. I expect to use the regular hollowing tools for this one, but it has introduced some interesting problems in mounting. The wood is soft and displays some of the common punky and spalted woods that are often found in spruce burl. On the other hand, it also has some of those bark inclusions, sap pockets and incurves that make these so much fun. Challenges are only design opportunities after all.
starting the burl

Sunday, February 17, 2008

New Work in Progress


I have been having some difficulty with uploading to YouTube so the next installment on the natural edged bowl will be a while, but at least I am trying. Meanwhile I have started another work in progress. This time it is deciphering a pile of wood that is mostly burls.

One of them, the large spruce burl has to made into a fruit bowl, I think with the natural edge obvious. The folks who own the big burl, I think maple, want a piece made with the burl surface obvious or emphasized. Other than that, it will be whatever the wood and I want. To start with I am going to do something with one of the smaller spruce burls.

This should be fun.

Wednesday, February 13, 2008

Sharpening Wood Turning Tools (3)

One thing a wood turner must do is rid oneself of the notion that the tool in the shop is a grinder, at least most of the time. For sharpening things like plane irons and chisels we have all sorts of things like sandpaper of various grits, oil or water stones, strops and who knows what all. To each his or her own.

For wood turning tools, we generally go straight from the grinder to the lathe. However, in this case the grinder is the sharpener. It is set up differently from that of a general shop worker or metal worker. Instead, it is set up to work with wood turning tools so as to give them a good edge and get quickly back to work.


For this I like a general purpose grinder available at most hardware stores. Mine is a high speed grinder, 1350 rpm. I realize that some like a slower sharpener but again to each his or her own. The reason stems from older tools make of carbon steel and also from a lack of experience. Improper technique on a fast sharpener tends to build up heat that will destroy the temper of carbon steel tools. Today's high speed steel (HSS) tools will be fine. Good technique makes a world of difference as in almost everything else.

Most grinders come with wheels well suited for grinding, not sharpening. One is likely coarse and the other medium. I like to put the medium one on the right side for grinding away nicks or dents in tools or to shape them when necessary. I do not like the little tables that come on most grinders and made a larger one for mine.


The left side becomes the sharpening side with an 80 grit or 100 grit aluminum oxide wheel. Some people like the white wheels but I find them too easy to wear and prefer a normal consumer wheel which for some reason wears better and costs a lot less.

Keep the wheels clean and round with a wheel dresser. I have used both a diamond dresser and a star wheel dresser and both work well. Clean wheels cut better and cooler.

On the left side goes a jig for sharpening. I simply find it gives a better, more easily repeatable grind. While some people like the jig for eliminating facets on the tool the best reason for using it is the repeatability of the grind. This allows your body to become used to the angles and learn to turn with the same tools, building habits of control. This is especially important for beginners. Once a lot of practice has been made you can more easily compensate for a different grind.

Monday, February 04, 2008

Sharpening Wood Turning Tools (2)

As Derek was saying (see his site by the way at Seafoam Woodturning )The motions used in freehand sharpening are similar to those we use in turning. For instance, to sharpen a roughing gouge one


  1. presents the tool resting on the grinder table (that rest in front of the wheel) with the flute up and the tool not yet touching the wheel.

  2. if right handed the handle is held in the right hand against the right hip

  3. the left hand steadies the tool on the grinder table

  4. raises the handle until the heel of the bevel touches the wheel gently and a hair more until sparks move over the edge

  5. roll the tool to the right as sparks move over the edge

  6. roll the tool to the left as sparks move over the edge


In theory the tool has moved through the same motions as cleaning a fine shaving right and left. The sparks coming over the edge indicate that a sharp edge has been formed and you are ready to turn.

In reality I find this is the time turners move the tool in wide arcs as they inspect the edge for sharpness and for facets on the bevel. If you are unsure of your sharpening enough for this to happen, you will likely consider

  1. the edge not good enough

  2. too many facets on the bevel

  3. the angle has changed


and back to the grinder you go until you have really messed things up or give up in disgust and go to the work anyway and find the edge works fine, but could have been better.

One of the big problems is simply you moved before returning to the wheel. The practice is sound but it needs practice. Try a couple of things.

  1. practice the motions with the grinder off. Feel the bevel on the wheel and do it several times. So it takes a few minutes; hopefully you are going to do this for the rest of your life.

  2. ignore the facets. No one else will see them and they will not really affect the final cut no matter what the jig using people like me say.

  3. ignore the angle. You have not likely changed it enough to matter. A degree or so is not the damage most people think. If you are off five degrees or more you really need a coarser wheel to reshape it and that is another subject.

  4. most important of all, do not move your hands from their anchor as you look at the edge. The left stays on the tool shaft and the right on the handle at your hip. That way you become the jig and the tool returns to the same place each time


I hope this helps. More thoughts to come.

Sunday, February 03, 2008

Sharpening Wood Turning Tools

There has been a discussion in progress over rec.crafts.woodturning dealing with some of the ins and outs of sharpening wood turning tools. I thought I would post a few of my views.

First of all, there is no definitive way to sharpen out tools and the same person will use different methods of sharpening say a skew versus a roughing gouge. I, for instance, would sharpen a skew free hand but use a jig for the roughing gouge, at least most of the time. A bowl gouge I would almost always sharpen with a jig for long wings but likely freehand for straight across but sometimes would reverse that. While I would like to give coherent reasons for doing so it probably depends more on mood than logic.

One of the problems that beginners have and continue having as they begin turning is the mastery not of sharpening, but of sharpening turning tools. Many turners begin their woodworking careers with flat work of some sort. There router bits and table saw blades are generally sent out for sharpening while chisels and plane irons are sharpened with an assortment of stones or sandpaper and possibly a few jigs. There also tends to be a fairly long interval between sharpenings. Not so with wood turning.

A wood lathe simply moves wood over the edge of the tool faster than does most other wood working methods. Wood turners also tend to use wood that is rougher than flat woodworkers and it may still have bark and grit in it. The edge of the tool simply does not last for very long under such circumstances.

Flat workers tend to use grinders to remove large amounts of metal under circumstances such as dents and nicks that call for a tool to be reshaped. A wood turner uses a grinder to quickly sharpen and get back to work. The fine edge of the wood plane simply disappears under the speed and fury of the lathe but the edge from the grinder lasts sufficiently well and cuts sufficiently well to be considered more than adequate for the job.

So a grinder should be thought of as a sharpener and only enough metal should be intended to be removed so as to leave a good cutting edge. For this reason some turners think a slow speed grinder is best for the job as it is cooler to work with and supposedly removes less metal. Others such as myself like a high speed grinder as with high speed steel heat is not an issue and I only intend to remove enough steel to leave a good edge. Enough is enough whether one uses a fast or slow grinder.

Over the next few days I will add some thoughts on free hand sharpening versus the jig.

Wednesday, January 30, 2008

Natural Edged Bowl - Roughing Inside

Ta Dah! this is the 100th entry on the blog. Applause please. Now that we have that over, I have managed to get another video up on YouTube dealing with the natureal edged bowl. This is the fun part, roughing the inside. This is also the quickest part, especially here with so much air to turn. Air turns fast. Duh! As always, comments are appreciated.

Friday, January 25, 2008

Back to Basics


I have been working on some things for the new website in answer to questions specifically from beginners. More and more I am convinced that we need to get back to the fundamentals of turning. In some ways the direction of turning today seems to reflect the direction of education.

Our educational system in North America appears to be ranging away from the fundamentals of societal need to move toward specialization without foundation. By that I mean for example that students are preparing term presentations with video cameras before they can write a script, or for that matter a coherent sentence. Algebra appears to be on the curriculum for students who cannot handle basic arithmetic without a calculator. It used to be that employers considered a high school graduate suitable for training for managerial positions. Now they hope that college graduates can read, write, and balance a check book, but there are no guarantees. Many colleges and universities have entry level courses, mostly non credit, to teach the basic skills of reading, writing and arithmetic to incoming students, some of whom were A level graduates of high schools but lack basic skills.

In the same manner, I hear people having bought lathes to turn salad bowls for a living or baseball bats for the team, but have never used the machine before. Many a would be turner goes to the lathe for the first time, puts on a length of construction 4x4, and watches his tool be kicked over his head by a whirling menace. Fundamentals are necessary to learn and practice. The old adage of "walk before you run" works well here.

Wood turnings all work alike; prepare, turn, sand, and finish. The preparation may range easily from chainsaw and log to band saw and board or drill press and pen blank, but wood must be prepared to go on the lathe. Segmented turners will cut and glue for ages but it is all to prepare the wood to go on the lathe.

Turning may be for spindle or faceplate work but tools are still needed to be sharp and presentation needs to be clear. Different woods cut a little differently and need to be learned and approached in their own manner. Too many a new turner has been discouraged with the common spruce or pine of the flat worker to later be amazed at the nice cutting qualities of a piece of maple or ash. Each style of tool requires a slightly or greatly differing approach, but they are all able to be learned and familiarity with one makes the next easier.

Sanding is as important to the wood turner as to any other wood worker. The person who looks at the final piece looks at the surface, not the work in it. Finishing can be as elaborate or as simple as one likes, providing it fits the piece. Some call for dyes, painting, carving, piercing, pyrography or a combination of these and other embellishments. For others it would be gilding the lily.

The fundamentals well learned will let us approach that beautiful piece of hideously rare and possibly expensive wood with confidence. Learning is good.

Thursday, January 24, 2008

Embellishments on Turning

We have been having a lot of fun lately over the rec.crafts.woodturning new group over the question: When is a turning not a turning?

Got me, but in some people's eyes, if a turning is pierced, painted, cut apart, glued up, torched, or a combination of any of the above it somehow ceases to be a turning. Actually a turning per se is often a glue up but still regarded as a turned piece and has been for ages, even by the naysayers of today. Candlesticks are often a turned base and riser glued together and some even glue on a separate cup. Still, even the stalwarts of traditionalism consider it a wood turning. Mallets and gavels usually have the head glued to the handle, yet again are called turnings.

On the other hand, some quibble if today a piece is glued to an obviously turned piece that it has ceased to be a wood turning and is now a something else. We are not sure what.

Legitimately, some wood turnings have become canvasses as such for some to paint on. While some may not call them wood turnings, I think starting with a pretty canvas gives you one up on most people. After all, DaVinci painted the Mona Lisa on a small piece of wood, poplar of some sort I recall, but may be in error.


Surprisingly, most would call this piece a turning, even the traditionalists. Actually the idea to burn a picture on wood is an old one. This was really what we call a "save" as opposed to tossing the piece in the fire. It cracked during drying as hollow forms often do and would have been waste. I glued a crack and burned an image into it, then a few more strands to camouflage the first and so on. Ash is not the easiest wood to burn in this fashion, but it seemed to work. Anyway, it was fun.

Maybe folks just need to lighten up and turn more.

Saturday, January 19, 2008

Natural Edged Bowl - Roughing Outside (3)Finding the Curve


For me, one of the things that keeps me coming back to the lathe is the everlasting hunt for the elusive curve. Every piece turned could be a little different with a subtle change in the curve of the bowl.

Here I have the fun of hunting in a spot where the curve changes dramatically as the bowl rotates. The line of the end will disappear around the side because the wood is simply not there. So the quest becomes a search for a curve that exists in different configurations at different spots. An ogee at one spot becomes a simple curve at another because half the figure is gone.

This is simply fun. The other side of all this is the wood is cheap to use. As I recall the pin cherry for this turning came from a tree that was too close to Dad's shed and was dying from black knot so it had to come down. Once I got it down, it was too good to toss so here it is.