Showing posts with label sharpening. Show all posts

Thursday, June 23, 2011

Five Tips for Sharpening Your Wood Turning Tools


One of the first things that woodturners realize, especially if they come to woodturning from other types of woodworking, is turning tools need to be sharpened early and often. In most cases they need to be sharpened a lot more often than other cutting tools and the skills needed are different than those to sharpen most other tools. Here are five tips to help get sharp tools quickly and easily for the wood lathe.
First of all there is the need to recognize a couple of angles, thirty and forty five degrees. Almost all cutting woodturning tools will use these angles and the few that do not will be glaringly obvious. Gouges and skews cut wood. Roughing gouges and bowl gouges are generally sharpened to forty five degrees and straight across. Many woodturners start with spindle turning and spindle gouges are sharpened at thirty degrees. Some turners try to sharpen roughing and bowl gouges to that same thirty with terrible results and are amazed when someone shows them the magic of forty-five.
Second is the need to keep things simple, especially at first. Stick to what has worked for centuries. Woodturning is over three thousand years old and most of what is done is tried and true. This is not to say that there have not been changes but it is good to start with the established norms before branching out. For instance, there is the other typically used grind for a bowl gouge that has long wings and a bevel that alters from about forty five at the edges to seventy in the center. A straight forty-five works beautifully and is a lot easier to do at first.
Then there is the sharpening of scrapers which are the real exception to what appears to be a sharp edge. They are sharpened almost square at about seventy to eighty degrees and the burr that is raised is the cutting area. It is quickly broken away and resharpening is needed often.
This brings up the fourth tip and that is to be satisfied with an edge that is sharp enough to remove wood and still hold up to the punishment of woodturning. For this a grinder is the best tool to use as a sharpening station. Equip it with an eighty grit aluminum oxide wheel and ignore the usual whet stones and honing strops. It can take a lot of time to get a razor edge that will disappear in the first second of turning.
Fourth, use a jig. Freehand sharpening is an art and craft in its own right and it is easier to learn to turn with sharp tools from a jig rather than trying to learn both crafts at once. Jigs will also teach the movements that are needed for freehand turning if the need arises. They can be either cheaply made in the home shop or purchased from just about any woodturning supplier.
Fifth and perhaps most important is to relax and take it easy in the sharpening. It is a part of the turning process and meant to be enjoyed. If an edge comes out wrong it is a simple matter to try again. A little time, a little attention and a little steel and back to the wood again.
Sharpening is not hard and woodturners have been getting a sufficient edge for over three thousand years. With a little practice you will be joining the group and the shavings will fly from a good, sharp edge.

Monday, May 09, 2011

Simple Chainsaw Bar and Chain Maintenance for the Woodturner


While the chainsaw is a valuable tool for the woodturner it is usually used intermittently. Maintenance is necessary as it is for all tools and can be easily accomplished.
It should be noted that chainsaws are extremely dangerous as tools go and should be treated with respect. Instruction in the use of the saw is necessary before using it and safety is the concern of the user. Protective clothing should be worn along with proper face, ear and eye protection. A well maintained saw is a safer saw.
First of all, examine the bar and chain of the saw. The chain should be sharp with all teeth the same size. Sharpening the chain involves two procedures, filing the teeth and filing the depth gauges. The teeth are easiest to file using the recommended size file and a guide that both holds the file and ensures that it cuts to the right depth. Each tooth should be the same length when finished so if one is duller than the rest and requires more filing, file the other teeth to the same length. One tooth longer than the others tends to pull the bar in its own direction and can cause binding. It is a good idea to touch up the teeth at every filling of gasoline or, if the saw is electric, every couple of hours of use. If the saw hits the ground or something other than wood, consider it dull and sharpen the chain. Some sawyers like to have their chains professionally ground at regular intervals and file in between.
The depth gauges are projections in front of the teeth and prevent the teeth from taking too great a cut and possibly catching and kicking the bar back at the user. If they are too high, on the other hand, the teeth are not able to cut to depth and quickly dull from rubbing the wood. Again, a simple jig from your chainsaw supplier allows for easy measuring and ensuring that each depth gauge is filed to the proper height. Depth gauges should be checked every few chain sharpenings.
The bar should be straight, clean and tight to the saw. There are adjustments for proper tension on the chain and it should be set according to your manufacturer's instructions. Too much tension can lead to over heating and ruining both bar and chain while too little tension can cause the chain to catch and kick the saw at the user or to fling the chain off and cause injury. Generally, all that is involved is tensioning a set screw until the chain moves easily on the bar. The bar is held in place with a couple of nuts that need to be checked every filling or at frequent intervals as the vibration of the saw may cause them to loosen.
One of the most obvious things to check and one that is too often not done is to make sure there is plenty of bar oil in the reservoir. This is different from the oil that is mixed with the gasoline and appropriate oils should be used in either case. Bar oil gets flung off by the movement of the chain but helps greatly in keeping the bar cool and in smooth cutting. Most saws are designed to need the reservoir filled with every filling of gasoline. Woodturners tend not to run a saw long enough to run it dry and may forget to fill the bar oil reservoir.
Routine maintenance should become just that, routine. Once the habit is formed, it ceases to be a chore and instead becomes an enjoyable part of the woodturning practice.

Thursday, April 14, 2011

Basic Equipment You Will Need to Start Woodturning Projects

 While it is easily understood that a wood lathe is needed to begin woodturning projects, there are a few other necessities before starting. Many of these are already found in the typical woodworking shop while others will need to be purchased.

The basic wood lathe comes with one or two faceplates for bowls and other large work; a spur center and tail center for holding spindle projects; and a couple of tool rests for different sized work. No cutting tools are generally supplied with the lathe.
While experienced turners will purchase individual tools, it is advisable for the beginner to get a beginning set. This will contain the necessary tools for spindle work. Usually this will be a roughing gouge, a couple of spindle gouges of different sizes, a couple of skews of different sizes, a couple of scrapers of different sizes and a parting tool. Such a set should be high speed steel, not carbon steel which is cheaper but does not hold an edge very long compared with high speed. Later on bowl and faceplate tools can be purchased or made. If the beginner is anxious to begin turning bowls, a one quarter inch bowl gouge will get them started and different sizes can be purchased later on.
Once the tools are purchased there needs to be a means to sharpen them. Woodworkers new to woodturning will be amazed at how often turning tools need to be sharpened. The usual means to a good edge is a grinder however most shop grinders have wheels too coarse to give a good edge on high speed steel. An aluminum oxide wheel of appropriate size should be purchased. It should be around eighty grit and a wheel dresser to keep it round and clean is really a necessity.
While some turners consider a sharpening jig to be a luxury, for a beginner it is almost a necessity. Sharpening woodturning tools freehand is a skill in its own right if not an art. Learning it at the same time as trying to learn woodturning is difficult and learning to turn with dull tools is almost impossible. A jig should be purchased or made at the very beginning.
One of the things that makes woodturning special is the ability to much of the time sand and finish a project on the lathe. Sandpaper in grits from eighty to two hundred twenty is usually found in the workshop but some turners like to go as high as two thousand grit for some projects. Generally up to three hundred twenty will be fine. Danish oil and similar finishes work well for most woodturnings and again is a typical supply of most shops.
Safety is an important part of any woodworking shop and work around a wood lathe is no exception. A face mask to protect from flying wood is a necessity as is a dust mask to protect the lungs from sanding. Hearing protectors are good to have. Most lathes are fairly quiet but saws, drills, sanders and dust collectors as well as other shop tools can cause hearing problems.
Tools to ready the wood for the lathe will likely be already in the shop. Bandsaws and table saws are often used and a chainsaw is a part of most woodturner's arsenals of tools.
A quick look at a woodturning catalogue will convince any aspiring woodturner that bits and pieces can be acquired for years to come but these should get one started. Certainly a lot of enjoyment are contained in these few simple items.

Saturday, March 05, 2011

Chainsaw Use For The Woodturner


   Very quickly, woodturners learn that one of the difficulties of woodturning is the acquiring of wood large enough for faceplate turning. It is both difficult and expensive. However, there is often a good supply of local wood in log form if the means to deal with it are available. A chainsaw makes the handling of logs and their processing into turning blanks readily accessible.
   One of the first things to know about a chainsaw is its danger. A chainsaw is one of if not the most dangerous power tools in the woodworker's arsenal. The working part of the saw is a bar covered with a moving cutting chain that is designed to crosscut through hardwood. As such it will not even pause for flesh. In addition it is a simple matter to catch the tip of the bar in such a manner so as to make the saw kick back or jump at the user with amazing speed and power. With this said, there are many people who use a chainsaw day in and day out without problem. While the risk of using any power tool rests with the user, it is a good idea in this case to get instruction from an experienced user before handling the saw on your own.
   Chainsaws come in a variety of types and sizes but for most woodturners there are some simple considerations to think of when buying. Saws are sized by power and bar length. As a general rule subject to all the dangers of generalities, a sixteen inch bar will be long enough for most turners and twelve will be a little short at some point in the woodturning career. Another general rule is to buy the most powerful motor you can afford. It is easier on the user and the saw assuming the weight is also good for the user.
   The power source will be either electric or gasoline. Gasoline is more convenient outside the shop but there is a danger form carbon monoxide when running an internal combustion engine indoors not to mention the huge noise from the motor. Electric saws require heavy extension cords and in general cut slower than gas saws, but are quieter and get the job done.
   The turner should learn to sharpen and maintain the saw. Chains dull quickly if they hit rocks or nails in the wood and sometimes they touch the ground when cutting logs to length. A chain that hits the ground is dull and needs sharpening. This is not difficult to learn and files for sharpening are cheap. If the saw is kept with the bar oiled and the fuel for a gas saw mixed properly, a routine maintenance check by a good repairman or dealer is all that will be needed for long saw life.
   Chainsaws need not be fearful for the woodturner to use and will make the gaining of bowl blanks and the like much easier. Good instruction can make all the difference in the pleasure added to getting ones own wood for woodturning.

Thursday, February 17, 2011

Sharpening Woodturning Tools: Making Sense Of Grinder Wheels For Sharp Wood Lathe Tools


Getting a good edge on a wood lathe tool is one of the great difficulties for a beginning woodturner and an ongoing concern for intermediates and experts. While the grinder is the tool of choice for woodworkers sharpening tools for wood lathes, getting it set up with the correct wheels can be a confusing challenge. It need not be with a couple of simple steps.

First it is necessary to move in thinking of the grinder as a sharpener. Many people come to woodturning from general woodworking where the grinder is used to remove lots of metal in a hurry so as to grind away nicks and breaks in chisels, plane irons and the like. Water stones and honing implements are used for final edges. Woodturners move from the grinder to the wood. Most shop grinders are not set up for this and the problem is largely the wheels.

Thus the second consideration is to replace the grinder wheels. While it is agreed that since woodturners generally use high speed steel tools they should have aluminium oxide wheels, there is a lot of confusion in the catalogues as to what color wheel to get and what bond to have. The color reflects individual manufacturers attempts to make choosing between grades of their particular wheels and has little to do with other wheels on the market. Consideration then should be given to grit and bond.

The bond of a wheel refers to how friable the material is that holds the aluminium oxide together. More friable bonds allow the material to break away quickly thus leaving a sharp cutting and cooler grinding surface. Unfortunately, the most friable bonds manufacturers recommend for woodturners groove, pit and wear quickly requiring a lot of wheel dressing and expensive replacement. Thankfully, almost any aluminium oxide wheel generally available to the home market is sufficiently friable for good sharpening with good wear so making sense of the friable numbers of bonds is not necessary. Just get a good wheel.

Third is consideration of the grit. While it may encourage argument, a good setup is a fast cutting wheel of about 46 grit on one side of the grinder and a sharpening wheel of eighty to one hundred on the other. With a good jig especially, this will meet all the shaping and sharpening needs of the woodturning shop.

Simply put, a couple of inexpensive aluminium oxide wheels of appropriate grit will give a lot of sharpening satisfaction and help to make a lot of shavings for a long time to come. Keep it simple and keep it fun.

Wednesday, October 29, 2008

Sharpening: Halloween Helper

Here is a quickie for people struggling to picture the shape needed for a spindle gouge and in some cases a bowl gouge with swept back wings. It is also the shape I sometimes use for an Oland tool, especially for bowls.

Some people call the shape a lady's finger nail. The other day I saw a perfect example in a local dollar store. The Halloween stuff was up for display and among all the clown paint and fake blood there were some packages of ridiculously long fake nails. They looked the perfect shape for a spindle gouge at 60*

Not a bad sharpening aid for the price. Sure, some folks might look at you funny when they see long, red, plastic nails by the grinder, but the cuts should be good.

Have a nice Halloween and may all your tools be sharp.

Tuesday, October 28, 2008

Sharpening, Once Again

I have been catching up on my emails to be answered and one question that comes up over and over again is that of sharpening. Really this is not surprising. After all, dull woodturning tools make for lousy and frustrating woodturning. Add to this the prevailing argument over free hand or jig sharpening and you either get a frustrated newbie who

  1. can not get the hang of freehand sharpening that we who have turned for a while learned after only two or three years
  2. decides the only way to go is to get a jee whiz bang jig and then finds out that it adds a hundred or two to his after lathe cost of tools, grinder, special wheels, sanding pads, and whatever else
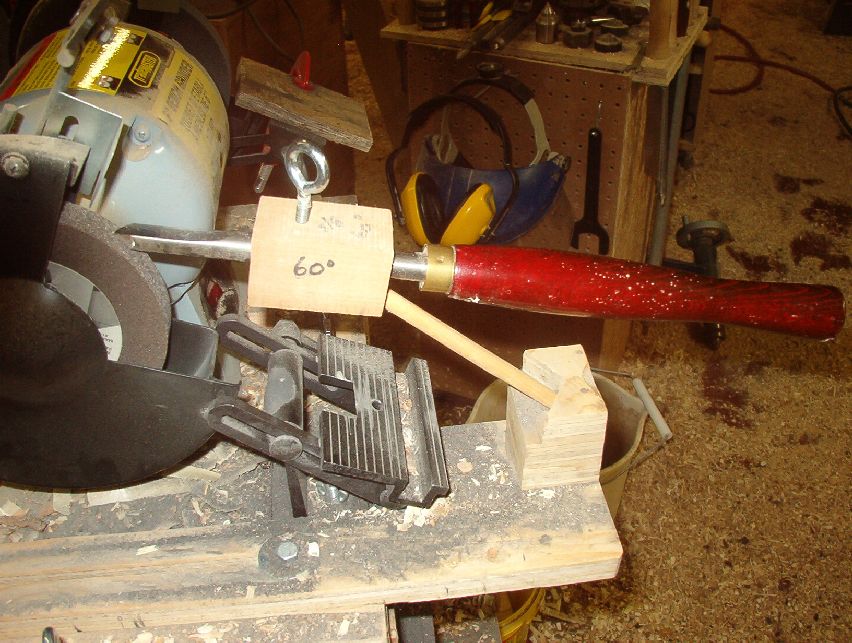
Years ago I built my $2.50 sharpening jig with the understanding that if it worked well for me, I would get a commercial one. You see, I was not convinced that I wanted to go from free hand to jig sharpening. The jig worked so well that I never got around to replacing it. One of these days I may, in a fit of energy, remake it in metal, but I doubt it. It works so well, why fix it?


jig with spindle gouge

There are not so much plans since every grinder is a bit different, but rather a discussion of building with photos over at sharpening jig. If you keep going to the last page there are videos of it working. For a couple of bucks, it is worth a shot.

Hope it helps. Keep turning.

Wednesday, February 13, 2008

Sharpening Wood Turning Tools (3)

One thing a wood turner must do is rid oneself of the notion that the tool in the shop is a grinder, at least most of the time. For sharpening things like plane irons and chisels we have all sorts of things like sandpaper of various grits, oil or water stones, strops and who knows what all. To each his or her own.

For wood turning tools, we generally go straight from the grinder to the lathe. However, in this case the grinder is the sharpener. It is set up differently from that of a general shop worker or metal worker. Instead, it is set up to work with wood turning tools so as to give them a good edge and get quickly back to work.


For this I like a general purpose grinder available at most hardware stores. Mine is a high speed grinder, 1350 rpm. I realize that some like a slower sharpener but again to each his or her own. The reason stems from older tools make of carbon steel and also from a lack of experience. Improper technique on a fast sharpener tends to build up heat that will destroy the temper of carbon steel tools. Today's high speed steel (HSS) tools will be fine. Good technique makes a world of difference as in almost everything else.

Most grinders come with wheels well suited for grinding, not sharpening. One is likely coarse and the other medium. I like to put the medium one on the right side for grinding away nicks or dents in tools or to shape them when necessary. I do not like the little tables that come on most grinders and made a larger one for mine.


The left side becomes the sharpening side with an 80 grit or 100 grit aluminum oxide wheel. Some people like the white wheels but I find them too easy to wear and prefer a normal consumer wheel which for some reason wears better and costs a lot less.

Keep the wheels clean and round with a wheel dresser. I have used both a diamond dresser and a star wheel dresser and both work well. Clean wheels cut better and cooler.

On the left side goes a jig for sharpening. I simply find it gives a better, more easily repeatable grind. While some people like the jig for eliminating facets on the tool the best reason for using it is the repeatability of the grind. This allows your body to become used to the angles and learn to turn with the same tools, building habits of control. This is especially important for beginners. Once a lot of practice has been made you can more easily compensate for a different grind.

Monday, February 04, 2008

Sharpening Wood Turning Tools (2)

As Derek was saying (see his site by the way at Seafoam Woodturning )The motions used in freehand sharpening are similar to those we use in turning. For instance, to sharpen a roughing gouge one


  1. presents the tool resting on the grinder table (that rest in front of the wheel) with the flute up and the tool not yet touching the wheel.

  2. if right handed the handle is held in the right hand against the right hip

  3. the left hand steadies the tool on the grinder table

  4. raises the handle until the heel of the bevel touches the wheel gently and a hair more until sparks move over the edge

  5. roll the tool to the right as sparks move over the edge

  6. roll the tool to the left as sparks move over the edge


In theory the tool has moved through the same motions as cleaning a fine shaving right and left. The sparks coming over the edge indicate that a sharp edge has been formed and you are ready to turn.

In reality I find this is the time turners move the tool in wide arcs as they inspect the edge for sharpness and for facets on the bevel. If you are unsure of your sharpening enough for this to happen, you will likely consider

  1. the edge not good enough

  2. too many facets on the bevel

  3. the angle has changed


and back to the grinder you go until you have really messed things up or give up in disgust and go to the work anyway and find the edge works fine, but could have been better.

One of the big problems is simply you moved before returning to the wheel. The practice is sound but it needs practice. Try a couple of things.

  1. practice the motions with the grinder off. Feel the bevel on the wheel and do it several times. So it takes a few minutes; hopefully you are going to do this for the rest of your life.

  2. ignore the facets. No one else will see them and they will not really affect the final cut no matter what the jig using people like me say.

  3. ignore the angle. You have not likely changed it enough to matter. A degree or so is not the damage most people think. If you are off five degrees or more you really need a coarser wheel to reshape it and that is another subject.

  4. most important of all, do not move your hands from their anchor as you look at the edge. The left stays on the tool shaft and the right on the handle at your hip. That way you become the jig and the tool returns to the same place each time


I hope this helps. More thoughts to come.

Sunday, February 03, 2008

Sharpening Wood Turning Tools

There has been a discussion in progress over rec.crafts.woodturning dealing with some of the ins and outs of sharpening wood turning tools. I thought I would post a few of my views.

First of all, there is no definitive way to sharpen out tools and the same person will use different methods of sharpening say a skew versus a roughing gouge. I, for instance, would sharpen a skew free hand but use a jig for the roughing gouge, at least most of the time. A bowl gouge I would almost always sharpen with a jig for long wings but likely freehand for straight across but sometimes would reverse that. While I would like to give coherent reasons for doing so it probably depends more on mood than logic.

One of the problems that beginners have and continue having as they begin turning is the mastery not of sharpening, but of sharpening turning tools. Many turners begin their woodworking careers with flat work of some sort. There router bits and table saw blades are generally sent out for sharpening while chisels and plane irons are sharpened with an assortment of stones or sandpaper and possibly a few jigs. There also tends to be a fairly long interval between sharpenings. Not so with wood turning.

A wood lathe simply moves wood over the edge of the tool faster than does most other wood working methods. Wood turners also tend to use wood that is rougher than flat woodworkers and it may still have bark and grit in it. The edge of the tool simply does not last for very long under such circumstances.

Flat workers tend to use grinders to remove large amounts of metal under circumstances such as dents and nicks that call for a tool to be reshaped. A wood turner uses a grinder to quickly sharpen and get back to work. The fine edge of the wood plane simply disappears under the speed and fury of the lathe but the edge from the grinder lasts sufficiently well and cuts sufficiently well to be considered more than adequate for the job.

So a grinder should be thought of as a sharpener and only enough metal should be intended to be removed so as to leave a good cutting edge. For this reason some turners think a slow speed grinder is best for the job as it is cooler to work with and supposedly removes less metal. Others such as myself like a high speed grinder as with high speed steel heat is not an issue and I only intend to remove enough steel to leave a good edge. Enough is enough whether one uses a fast or slow grinder.

Over the next few days I will add some thoughts on free hand sharpening versus the jig.

Tuesday, November 06, 2007

Sharpening a band saw blade


Here is a quick one for all of you use a band saw. Mine is an old (over 25 years) 10" Rockwell/Beaver. With a sharp blade it will cut through 5 1/2" of hardwood. The trick is that sharp blade. Considering the wood we cut which has bark inclusions, grit from the ground where it was felled, and some exotic oils, it is amazing that the edge lasts at all. For most of us the blade dulls long before the end of the useful life of that blade. So I sharpen mine using an idea from Steve Russel.
With the blade still on the machine I can sharpen it and be back to work in about 5 minutes or less. This is for a 3/8" 3 pt hook tooth blade. I get anywhere from 3 to 6 sharpenings per blade. I am sure it is not as sharp as a new blade but it sure is a lot cheaper and it still does a nice cut through 5 1/2" hardwood.

Friday, October 26, 2007

Sharpening Bandsaw blades

just a quick note today folks. I put a video up over at YouTube on how I sharpen bandsaw blades on the the saw a la Steve Russel's method. It works great. I figure a 3 pt 3/8" blade takes me about 5 minutes including set-up. I will have more info on the web site at Around the Woods in a couple of days.

Sunday, August 26, 2007

Wood Turning at the Exhibition


This last week we had the Provincial Exhibition at Truro. The local historical society has a branch at the Farm History Museum at the fair grounds. -During the exhibit they try to have crafts people demonstrate some of the old crafts from quilting to spoon carving. The last couple of years they have invited me to demonstrate for a day of wood turning. I really enjoy it.
I took along a lathe and turned mushrooms, potato mashers, and dibbers. Part of the time I had various people at the lathe trying it out for the first time or just learning some stuff.
It always amazes me when turners look at the shavings coming off and are amazed at sharp tools. I get them to touch up the gouge edge at the grinder and jig I bring along and then turn. The jig makes it simple.
While there, a fellow from the local paper came along taking pictures of various exhibits, including me. I thought he might put a small one of me alongside of a feeding horse or something but instead I got about a third of a page. Some days they are just hard up for news. :-)

Tuesday, August 14, 2007

Wood turning


I got back in the shop today for a while and started turning some cooking spoons for a friend. They are about 13" long with a slightly offset handle. Unfortunately, now that the turning is done, it is time to carve the bowls of the spoons. Not my favorite thing, but necessary. I will eventually get a page up about it but I am also trying to get some beginner pages up on tool selection, sharpening and the like. It is a pleasure to be turning spindles again. Maybe I will put the faceplate stuff on indefinite hold and do some more spindle work. We'll see.

Friday, June 29, 2007

Sharpening thoughts

HI. Sorry it has been so long since last post but things have been busy. At the moment I am in a bit of a quite time before I go to camp next week. I volunteer to do spiritual direction for a week each summer at Camp Pagweak in Pugwash, Nova Scotia. A lot of fun but a tiring time. This year it is day camp with a bunch of 6-9 year olds and counselor trining in the evening.
I have not been turning a lot lately. I broke a bone in my foot a couple of weeks ago and standing for a while is a literal pain. It has been getting a bit better and I got a garden mushroom done from a piece of spruce log.

Anyway, I was reading on the newsgroup a message from a guy who has figured out the fun of turning. When the edge starts to feel a little dull, sharpen. The shavings come better and the effort disappears. I know you can lean into a cut and force the wood, but how much time does it save in the long run. When would bother to force a dull plane hoping it would make as nice a cut as a sharp one? So sharpen. I like a jig although I do some freehand. It only takes a few seconds to sharpen and the work is a game with sharp tools. Relax and cut.

I have some ideas on how I sharpen over on the sharpening pages If you do something different I would like to know.