Showing posts with label woodturning. Show all posts

Wednesday, March 18, 2015

Snow and Turning Do Not Mix

Sorry about not getting more turning done and up for you to read. Winter has hit with a vengeance. I am tired of shoveling. Normally I step out my front door to some brickwork. Now I step out to snow and ice. In the spring, summer, fall I can back up to where the door is just about hitting the car to bring in groceries and stuff. Actually I could easily get it to where the door hit the car but what would be the point? Look at this.

Yep. That mess to the left of the shovel is about 20 feet from the house and left by the plow to block the path. No anger at the plowman. He has to put the stuff somewhere. Part of it he put in the front of the path to the shop. It is a good forty feet. Used to be thirty but the snow had to go somewhere. I have shoveled the paths at least 3 times today and some of the snow I carried 20 feet by the shovel full to have a place to dump it. The whole province (Nova Scotia) seems about the same.

I miss my lathe. I miss the shop. I miss the time to turn. However, enough complaining. Spring is around the corner. The snow will go and I can retire the snow shovel for the duration. Wood will be found and turning will go on. Back soon with wood.

Monday, March 09, 2015

Woodturning Design - A New Look at an Old Question

I was looking at an old hard drive and some of the pictures on it, deciding what to keep, when I stumbled on some pictures of the progressive turning of a birch hollow form from some years back. It all started as a sort of mess; a crotch piece with branch growing from it, maybe six inches thick and 7 or so across and about 8 inches long. So it would have two centers from the trunk and two more from the secondary trunk and branch. Each of these is a familiar split area and also a spot of elongation as the piece dries  and settles.


On the other hand it should have some great feathering pattern from the crotch and other patterns around the branch entry and each center. A hollow form should show all of these with a little planning.

I thought this would be a good time to ask those old questions of what makes a good design for a woodturning? So I decided to introduce a section to around the woods. For now it will start with getting from there to here


As time progresses I hope to bravely consider what makes good design and get shot for it or at least to start some dialogue going. It should be fun. I will also link to a few other places where I have commented on the thought processes that go into the pieces I have turned. Some good and some mistakes. One or two have ended up in the fire not because they split or came apart on the lathe but because they looked like crap. Future ones like that I will photograph and we can all pick them apart. Like I say, it should be fun.

Monday, February 23, 2015

Questions About Recycling, Reusing In the Midst of the Big Clean

As I was cleaning off my old mono-tube lathe and its base, I of course came across my old oil tray. This is just a cookie sheet with a stand off to hold a wire tray. When I turn things like tops, mushrooms, spatulas and the like I dip them into a mix of vegetable and mineral oil and leave them in the tray to drip dry. These oils are not harmful to the environment, edible, an supposed non drying. They get absorbed into the wood and can be renewed easily. People with wooden cutting boards and spatulas or spoons in the kitchen are supposed to re-oil them once a month. It may not happen, but we should.
So now those non-hardening oils have hardened to a solid mass around the wire mesh and congealed to a disgusting slop with wood dust and shavings in the tray.


The only way to salvage this is to take it in the house and wash it in the auxiliary sink. There is no way my wife is going to let it in with the dishes and I do not blame her. I had to first scrape out the tray and use a wire scrub brush on the tray. Lots of cleanser later, it looks pretty good.


It must have taken a good hour or more, lots of elbow grease and too much cleanser down the drain. I am a recycle nut. The wood I use is mostly firewood and landfill with a bit of farm grown exotic thrown in for pens. The shavings are used for mulch and compost, mostly compost. Any leftover pieces of wood are kindling and firewood and the ashes go in the compost pile. We recycle plastics and paper and anything else we can. On the other hand, two minutes and two bucks in the dollar store would have replaced this setup easily. Sometimes doing what is right takes time and effort. Looks good though and kind of satisfying. 

Sunday, February 08, 2015

Really, It's All About the Wood - And the Friends

Some new pages on the great shop clean are up.

As I was cleaning through the shelves, a long and reflective happening, I came across a bunch of flat pieces. Some of these were small sections of well grained log that should make decorative plates. Others were pieces that I will likely use for glue plates and the like. Some I will possibly thread as faceplates. Regardless, these are all hardwood sections and now well dried. These would come at a cost as there are more than a few board feet here.

I was reflecting on how good it is to have friends and how fortunate I am. I buy very little wood. Most of this came from friends who were going to dispose of it somehow and thought to call. Some others came simply because friends who cut firewood for a living found too nice a piece to be burnt and thought of me. Big or small, the thoughtfulness makes it worth a lot.


Friday, February 06, 2015

More Cleaning, More Wood, It's Coming Along

 I am continually amazed at the amount of wood we throw out in the province of Nova Scotia every year. The great stuff that get burned as firewood is at least firewood but still there is a great deal of wastage. I once watched a pallet mill make some bird's eye into pallets for shipping because that was the next wood in line. They would not let me buy the wood or the pallets.

As I continue to clean up the shop I continue to come across gems in the woodpile. Some of it is beautiful wood while other pieces teach me about the wood itself, how it moves and cracks and adjusts. We are privileged to play with such wonderful material.

I have found a super hoard on the next shelf as the clean up goes on.

There is everything from butternut to maple to ash and even some basswood to carve. Too bad I have to wait to use it until I am finished the great clean.


Saturday, January 31, 2015

Memories of the Past - Carvings Surface from the Boxes

As I have been going through the shop I have been finding all kinds of things. One of the things that occupied my time before the turning bug bit was wood carving. I still have a lot of the stuff around including some finished and unfinished carvings.


One of these days I have to get back to it or them or whatever. For now it is back to the massive cleanup. Maybe to find more memories.

Today's Postings

Start of the Cleanup

Wednesday, November 12, 2008

Wood Everywhere

November is here already. As a matter of fact, it is almost half gone and the stores are all Christmas nutty. One of the things that is happening around my part of the world; Nova Scotia, Canada; is the sudden appearance of wood piles as folks get in next year's wood.

The idea is to get green wood this year to cut to length and split for next year's fires once it is dry. Some folks even go a couple of years ahead. However, this is a woodturner's dilemma. What wood to turn and what wood to burn?

Advice? Keep the best looking stuff. Crotch wood has some great grain but can be hard to dry. So what? If it splits it is fire wood. No loss. The same with twists and turns and burls. Look for some good grain and if you find it while splitting, keep the logs from near it. If you keep your eyes open, there are some great finds in the wood pile.

By the way, keep some of the plainer, straight stuff for some kitchen spindle work and the like. Clean wood is great too.

Saturday, November 08, 2008

Bandsaw Cut

One of the most used tools for some woodturners is the band saw. In fact, I would recommend the band saw over the table saw for most turners while for cabinet enthusiasts the table saw is the first choice. However, while I consider the band saw to be one of the safest saws in the shop, safety is still an issue.

In particular there is the cut through a cylinder, not an infrequent need for many projects. Cylinders roll. If a cylinder rolls while being cut on a band saw, chances are excellent that the blade will get crimped and either draw a hand into the blade, snap the blade, weaken it to where it will snap the next time it is used or so damage it that it will come off the wheel. Of course any combination of the above is also possible.

At best, a piece of wood is damaged and at worst a serious cut is obtained with blood everywhere. Incidentally, if a catch happens it is extremely fast and a band saw for turning usually has at least a 1/2 and likely a 3/4 horse motor. There are very few people in the world strong enough to hand the wood and prevent an accident. Safety first.

Lately I had to cut off a section from a cylinder that had two diameters. For safety reasons I wanted a level cylinder. All that took was a shim under the smaller diameter. To keep the wood from rotating I simply took a clamp that rode on the table and used its holding power to grip the cylinder far more strongly than I could by hand. The arm of the clamp prevents rotation and what might have been a catch simply becomes a cut. Take your time through the cut if the wood is green especially.

Band Saw Safety Cut

Thursday, November 06, 2008

Sticking to Woodturning

There is some debate over the most important additions to the woodturner's arsenal in the past century or two. I am not going to pretend to have a definitive answer, just a couple of observations. Tool innovation has really only made small changes to hollowing, cutting and scraping tools. The four jaw chuck has made life easier in holding work but can be worked around by other methods.

I think one of the great advances has been the improvement in glues. Cyanoacrylate or CA glue in particular is used by woodturners on a daily basis. Thin CA can be dripped into a crack followed by fine dust from the same wood and the crack is almost invisible after the finish is applied. Some people use thin CA as a finish on small objects. Thicker CA is used to glue in brass tubing for pens and other projects. It is also unique in that it can make an almost instant bond with wet wood and can be used to hold a green piece to a waste block for turning.

Still, one of my favorite uses for CA is to simply hold wood together for turning. This CA dripped into a punky spot will keep it hard enough to turn. Thicker CA can glue together a piece that would otherwise split off.

CA has helped us to become better users of rare resources, pretty woods.

Monday, November 03, 2008

Another Use for Bottom Jaws

Woodturners have variations on how to turn the bottom of bowls. Most use a donut jig or some sort of chuck jaws such as ones with plans on my web site, Bottom Jaws. However, any of these methods can also answers what has been a problem for many of us, how to save a bowl that has become a funnel.

By this I mean the times that I have had a bowl almost finished to find that a lapse in attention has caused me to turn through the bottom into the waste block I commonly use. I know; using a depth gauge would have prevented the difficulty but so would hove not permitting my mind to wander. However, I do know that I am not alone here, most of us have some pretty kindling with nice bowl sides and a hole in the bottom.

One way to solve the problem is to glue on a separate piece of wood to the bottom of the bowl and turn it cleanly. The difficulty is remounting to the lathe so as to leave everything centered. The answer is a flip.

1) glue the new bottom in place and about 1/4" too thick.
2) mount the bowl in the bottom jaws
3) turn a tenon on the bottom
4) FLIP the bowl over so as to hold the tenon in regular chuck jaws
5) turn the inside, sand and finish
6) FLIP the bowl into the bottom jaws
7) remove the tenon
8) turn and finish the bottom

hope it helps

Sunday, November 02, 2008

Simple Tool Rack

I had a question lately about making a tool rack for woodturning tools. Generally I have seen three variations on the theme.
1) a series of tubes on end to take the tool shafts. The tubes may be in a bucket or box.
2) a box similar to a shallow drawer, sometimes literally a shallow drawer with dividers to keep the tools from rolling into one another and ruining the edges
3) a board with holes drilled into it to accept the tool shafts. The board is usually fastened to a wall or near the lathe.

I like the latter concept as it is quick to make and convenient to use. However, even easier is to pick up one of those tool holders at the discount bin of the hardware store. They seemed designed to hold all sorts of screw drivers and wrenches or the life but the holes seem to fit things life standard lathe tools, knock out bars, tommy bars for chucks, lathe wrenches and the like.

Friday, October 31, 2008

Poppy Hint

Here in Canada Remembrance Day is just around the corner, November 11, and poppies are being presented for donation reception by our Legionnaires. Lots of other
countries celebrate the same day under different names like Armistice Day or even Poppy Day. When I was serving as Legion Padre in Perth-Andover, New Brunswick, we would gather at the cenotaph in Perth for 11:00, move to the the cenotaph in neighboring Aroostook Village to conduct their cenotaph service, and then go to Fort Fairfield, Maine to assist the VFW in their service as they did not have a padre. Besides, some of our memberes had served in the American forces.

As a pastor, nephew of veterans, former Legion padre, and part time services padre, I encourage everyone who can to donate to the work of the Legion and VFW and to wear the poppy to commemorate the day and be thankful for the peace we enjoy. Take time during the day to pray for our vets and for the new ones being created in so many parts of the world. Of course I am thinking today of Afghanistan and Iraq in particular, but our men and women are fighting in many parts of the world and still lay down their lives for God, family and country.

Here is hint for the poppy wearers. I am one of those people who can lose a poppy just by thinking about it, or not. So, if you are one of those woodturners who makes ear rings and has a stash of ring backs, put one over the pin of your poppy so it does not fall off. Other wise go to the cheapie display of jewelry at the discount store and pay a buck or two for some gaudy junk you would not be caught dead wearing or knowing that giving it to your wife may be an act of suicide. After all, why toss the good stuff? Dump the ear rings and keep the backs for poppies. Now you can afford to give extra for the poppy because you know you only need one and fewer will be wasted. Better for the environment and everyone else.


By the way, for extra brownie points get a really nice pair of earrings, hide them until after Remembrance Day, use the backs for the poppies, get the extra back from your wife and then give her the earrings. That of course is for the fellas. Ladies can find their brownie points on their own.


In Flanders Fields
by John McCrae
Written in Flanders on May 3, 1915

In Flanders fields the poppies blow
Between the crosses, row on row,
That mark our place; and in the sky
The larks, still bravely singing, fly
Scarce heard amid the guns below.

We are the Dead. Short days ago
We lived, felt dawn, saw sunset glow,
Loved, and were loved, and now we lie
In Flanders fields.

Take up our quarrel with the foe:
To you from failing hands we throw
The torch; be yours to hold it high.
If ye break faith with us who die
We shall not sleep, though poppies grow
In Flanders fields.

Wednesday, October 29, 2008

Sharpening: Halloween Helper

Here is a quickie for people struggling to picture the shape needed for a spindle gouge and in some cases a bowl gouge with swept back wings. It is also the shape I sometimes use for an Oland tool, especially for bowls.

Some people call the shape a lady's finger nail. The other day I saw a perfect example in a local dollar store. The Halloween stuff was up for display and among all the clown paint and fake blood there were some packages of ridiculously long fake nails. They looked the perfect shape for a spindle gouge at 60*

Not a bad sharpening aid for the price. Sure, some folks might look at you funny when they see long, red, plastic nails by the grinder, but the cuts should be good.

Have a nice Halloween and may all your tools be sharp.

Tuesday, October 28, 2008

Sharpening, Once Again

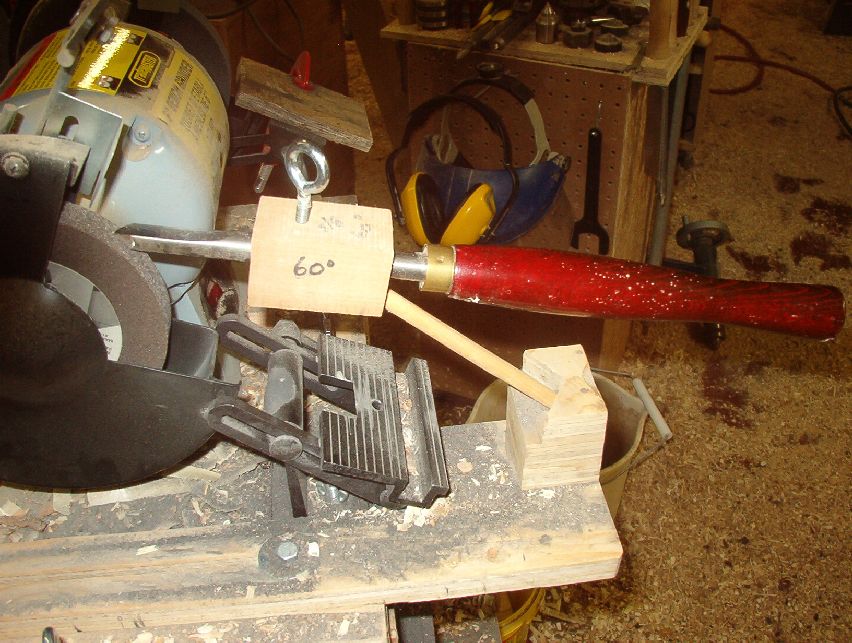
I have been catching up on my emails to be answered and one question that comes up over and over again is that of sharpening. Really this is not surprising. After all, dull woodturning tools make for lousy and frustrating woodturning. Add to this the prevailing argument over free hand or jig sharpening and you either get a frustrated newbie who

  1. can not get the hang of freehand sharpening that we who have turned for a while learned after only two or three years
  2. decides the only way to go is to get a jee whiz bang jig and then finds out that it adds a hundred or two to his after lathe cost of tools, grinder, special wheels, sanding pads, and whatever else
Years ago I built my $2.50 sharpening jig with the understanding that if it worked well for me, I would get a commercial one. You see, I was not convinced that I wanted to go from free hand to jig sharpening. The jig worked so well that I never got around to replacing it. One of these days I may, in a fit of energy, remake it in metal, but I doubt it. It works so well, why fix it?


jig with spindle gouge

There are not so much plans since every grinder is a bit different, but rather a discussion of building with photos over at sharpening jig. If you keep going to the last page there are videos of it working. For a couple of bucks, it is worth a shot.

Hope it helps. Keep turning.

Monday, October 27, 2008

New Video in the works

Sorry to be so long in posting. I am working on it as life settles down into the new church, a different schedule for karate, and less time at the lathe. A question that has been raised to me a few times now is where to begin turning?

By this most woodturners to be seem to wonder if they should start by making table legs or spurtles or bowls or whatever. I think the best thing to start with is making a stick and a bunch of shavings. In fact, I think it is good for an experienced turner to make a stick and a bunch of shavings every now and then.

It teaches us or reminds us from whence we come. Take a log and mount it onto the lathe between centers and start removing stuff. First a rough object is reduced to a smooth one. The features of the log are revealed; knots, weak wood, insect holes and the like. Practice is given in entering at a precise place, cutting downhill with the grain, riding the bevel and so on.

Besides, this is fun and a lot of shavings are obtained for the compost pile.

I have shot the footage of me turning down a 10" diam by 16" log and should have it edited and uploaded soon. I will let you know.

Thursday, September 18, 2008

Great Legs from Paris

I'm back. In fact my wife and I are back from a week in Paris followed by a week in the Lake District of England. The trip was great except for having my wallet lifted in Paris. Thankfully there was little cash in it and I canceled the cards before they could be used. All it amounted to was a nuisance.

While we were in Paris we saw hardly any turnings in the shops. There must be some somewhere, but I failed to see it. However, when I went to the Louvre there were a couple of turnings in the Egyptian section. All the way to France to see turnings from Egypt, this is a small world.

Notice the legs here
Egyptian wood turned table legs
These are well turned with mortises cut for stringers and beads to decorate the feet. What is remarkable is the similarity to something we might turn today but these are from the New Kingdom, around 1550-1069 BC, say around 3000 years ago. Talk about nothing new under the sun.

Then there was this table (sans the top) from the same time period.
Egyptian woodturnings, table baseIn fact, the work is so similar that it may have been the same maker. On the other hand, it could just have been the style or for that matter a request to duplicate the existing furniture.

There was some other wood around but no other turnings that I saw. It is remarkable to me that wood has lasted 3000 years. On the other hand, there may have been lots of turnings in the Louvre. Only a part of what is on hand is displayed and it would take ages to see just the displays.

Lots of fun and lots to think about.

Friday, May 02, 2008

Next Burl

So here is a picture of the next spruce burl on the lathe. it was wrapped around a branch as you can see. One of the things I think is going on in the branch is tension that may lead to a split, but that should not matter in a decorative piece like this will be. There are a lot of worm holes in this one. I suspect the spruce bark beetle. It has decimated some of the stands around here although nothing like the pine bark beetle has done out west.

This one is a lot of fun. I will try to get a couple of pages up on the web site in a couple of days.

Thursday, May 01, 2008

Wood turning today

Things have been quiet in the shop. On the weekend we took a trip to Ontario to visit our son and daughter. It was a great time and I saw a lot of trees, but there was little time to turn any wood or to meet with fellow wood turners. Maybe next trip. When we got home I had a raspy throat which did not bode well, especially since I had a funeral to handle the next day. Sure enough it developed into a terrible head cold. I got through the funeral as if there was a choice, but no time in the shop. Today was the last day of a weeks vacation but it was all I could do to get out of my own way. Tomorrow I hope to get back to a piece that is on the lathe, another spruce burl hollow form. I will try to get some pictures up soon.

Thursday, March 20, 2008

work in progress: burl on the lathe - remove the block


I have put a couple more pages up on the web site dealing with turning the spruce burl. The piece has been flipped end for end and the glue block removed. This is one of the things that throws people at first but it is fairly simple. Just take your time.

It is easy to rush things this near the end. Unfortunately, that can make a catch happen and there is not a lot of wood left on the piece. One good catch and boom she goes. While there is a lot said about riding the bevel and making sure the edge is sharp and all that other true stuff, the big thing is to take your time. There is no need to rush.

Think about the cut.
Make the cut.
Look at the result.
Do it over.

Remember that the fun is in the doing and the result is just nice to see. Ok, a lot of the fun is in the result too, but take the time to enjoy the cuts. Chances are, none of us enjoy the catches.

Have a good Easter.

Darrell

Friday, November 23, 2007

Roughing a Bowl, Video 3: Marking out the circles


I like to cut away as much as possible of the blank before roughing the bowl. Some turners with larger and more powerful lathes like to throw on the half log and turn but I find the chain saw faster to work with. Also, the better balanced the blank the easier and safer to turn.

Actually, for larger bowls, say 10 inches and over, I usually cut an angle at the ends to match the slope of the sides, but this is a more dangerous cut for the inexperienced so I left it out of the video. Hope you enjoy.